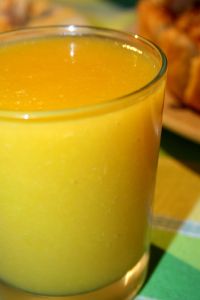
Melocotón en almíbar…en gelatina!!! / Peaches in syrup…in gelatine!!!


El peque de la casa quería gelatina de melocotón, y claro, como no sabía hacerla, no se me ocurrió nada mejor que triturar melocotón en almíbar y añadirle unas láminas de gelatina disuelta en unas cucharadas de agua.

Después a la nevera y a esperar a ver que pasaba.

Resultado??? Que el peque se relamía de lo rico que estaba!!!! Objetivo cumplido!!!!

Si alguno de vuestros pequeños saltamontes os pide gelatina y os pasa como a mi, que ni idea, pues ya sabéis, fácil y rápido!!!

The small boy of the house wanted peach jelly, and of course, not knowing it, I can not think of anything better than crushed peaches and add a few sheets of gelatine dissolved in a few tablespoons of water.

Then, the fridge and wait to see what happened.

Result?? The small boy smack his lips because of how rich it was!! Mission accomplished!!

If  any of you are asked for gelatin and you’re like me, who no idea, then you know, quick and easy!

Tarta de moras // Blackberries pie


Esta tarta no la hice ahora, sino en verano, cuando las moras estaban en su mejor momento y después de trepar para poder recogerlas.

Es muy facilita de hacer, y aunque su aspecto no era demasiado bueno, la verdad es que de sabor estaba buenísima.

Ingredientes:

1 lámina de hojaldre

200 gr. de moras

4 cucharadas de azúcar

130 gr. de nata líquida

2 yemas

Primero ponemos la lámina de hojaldre en un molde redondo, la pinchamos un poco con un tenedor y la horneamos hasta que esté dorada.

Después ponemos las moras encima del hojaldre y espolvoreamos con el azúcar.

Batimos las yemas con 2 cucharadas de azúcar y le añadimos la nata.

Echamos la mezcla por encima de las moras y horneamos sobre 45 minutos (el tiempo dependerá del horno, así que tendremos que estar pendientes)

I didn´t this cake recently, but in summer, when the blackberries were at their best, and after climbing to collect them.

It is very easy to make, and though its appearance was not too good, the truth is that flavor was excellent.

Ingredients:

1 sheet of puff pastry

200 gr of blackberries

4 tablespoons of sugar

130 gr. of cream

2 yolks

First we put the sheet of puff pastry into a round mold, punctured a little with a fork and bake until golden.

Then we put the blackberries top of the puff pastry and sprinkle with sugar.

Beat the egg yolks with 2 tablespoons of sugar and add cream.

Pour the mixture over the blackberries and bake about 45 minutes (the time will depends on the oven, so we will have to be pending)

Mouse de melón y naranja // Melon and orange Mouse


Para la cena del pasado fin de semana quería hacer algo fácil y fresco, porque aunque aquí no se nota estamos llegando al verano. Así que navegando por Internet llegué al blog de Noe, “La suculenta”, y me encontré con este mouse que casi se hace solo.

Desde aquí darle las gracias, porque es realmente refrescante y está buenísimo. Yo seguí su receta al pie de la letra y el resultado fue sencillamente perfecto.

Si necesitáis un postre rápido, fácil, sabroso y que sea un éxito seguro, no dudéis de que es este.


Ingredientes:

Zumo de 2 naranjas

6 hojas de gelatina

1 cucharada de ralladura de naranja

500 gr. de melón

400 gr. de nata

125 gr. de azúcar glass.

Ponemos el zumo a calentar y disolvemos la gelatina. Reservamos.

Pelamos el melón y lo troceamos. Lo trituramos con la batidora y lo pasamos por el pasapurés. Yo no tengo, así que lo puse en un colador grande y lo apasté con un cucharón.

Le añadimos el zumo con la gelatina y la ralladura de naranja.

Por otro lado, montamos la nata (bien fría) con el azúcar y la incorporamos a la mezcla con cuidado de que no se nos baje.

Sólo nos queda poner el mouse en copas de presentación o en un recipiente y a la nevera de 4 a 6 horas.

De nuevo, gracias Noe, porque aprendí a hacer un postre que sin duda me dará muchas alegrías.

For dinner last weekend I wanted to do something easy and cool, because although we don´t note here we´re reaching the summer. So surfing the Internet I found Noe´s blog, «La suculenta», and I found this mouse is almost done alone.

From here, thank you, because it is really refreshing and delicious. I followed her recipe exactly and the result was just perfect.

If you need a rapid, easy, tasty dessert and that it is a sure success, you do not doubt that is this.

Ingredients:

Juice of 2 oranges

6 sheets of gelatin

1 tablespoon of orange zest

500 gr. of melon

400 gr. of cream

125 gr. of powdered sugar.

We put the juice to boil and dissolve gelatin. Reserve.

Peel the melon and slice. We crush it with the mixer and pass it for the vegetable mill. I do not have, so I put it in a big colander and squash it with a ladle.

We added the juice with gelatin and orange peel.

On the other hand, whip the cream (cold) with sugar and incorporate it into the mix, being careful that we are not down.

We only have to put the mouse in presentation cups or in a container and refrigerate it from 4 until 6 hours.

Again, thanks Noe, because I learned to make a dessert that no doubt will give me many joys.

Cherries Glamour // Glamour cherries


Aunque hace más de dos semanas que ha terminado la época de esta cereza tan «exclusiva», no quería perder la oportunidad de hablar de ella.

Primero porque es la cereza más cara del mundo y segundo, porque sólo hay un productor mundial de este tipo de cerezas, y es Español.

La cereza es una fruta rica en vitaminas, hierro calcio, etc…. es diurética y muy, muy saludable, aunque tiene mucho azúcar, por lo que no es muy recomendable para personas diabéticas o que están a dieta.

Normalmente, la época de la cereza comienza en Abril y termina en Septiembre, pero el tipo de cereza del que hablamos hoy, madura más temprano y por lo tanto, son las primeras del mercado.

Las «Cherries Glamour» las produce la empresa Glamour Edoa, de LLeida, y está especializada en este tipo de «cereza precoz». Se cultivan con técnicas ecológicas, se recogen a mano diariamente y en su mejor momento de maduración y en 24 horas las recibe el cliente recién cosechadas y listas para el consumo.

Se caracterizan por su color rojo oscuro, su dulce e intenso sabor y su gran dureza, y tienen un calibre entre 28 y 32 mm.

Otro tipo de cerezas que sin duda merecen la pena son las del Valle del Jerte, con denominación de origen propia y seguramente las mejores cerezas de España.

Y los que tampoco puedan disfrutar de estas últimas, pues que no se preocupen, hay muchas variedades en el mercado también muy ricas y dispuestas a ser un increible postre.

Although there are more than 2 weeks since this «exclusive» cherry´s time has gone past, I wouldn´t lose the opportunity to talk about her.
First, because It´s the most expensive cherry of the world, and second, because, there is only one producer of this kind of fruit, and is Spanish.
Cherry is a fruit rich in vitamins,  Iron, Calcium, etc… It´s diuretic and very, very healthy, although It has a lot of sugar, so It´s not recommended for diabetic people or those who are on diet.

Usually, the time of the cherries begins in April and ends in September, but the kind of cherry we are speaking today matures earlier and therefore, they´re the first ones in the market.
Cherries Glamour are produced by the company «Glamour Edoa», in LLeida, and is specializing in this kind of precocious cherry. They are cultivated by ecological techniques, pick by hand every day on their best moment of maturation and in 24 hours, the customer receives them ready for consumption.
They are characterized by dark red color, sweet and intense flavour and their big hardness, and they have a diameter of 28-32 mm.
Another kind of cherries that undoubtedly are worth it, are those from «Valle del Jerte» with their own origin denomination and surely, the best cherries in Spain.
And those who couldn´t also enjoy these last ones, don´t worry, there are a lot of varieties on the market, very delicious too and ready to be an incredible dessert.

Fresas con chocolate y almendras // Strawberries with chocolate and almonds


Como todos sabeis, el domingo pasado fue el Día de la Madre, y como madre no hay más que una, pues había que hacer algo especial para la comida familiar.

Así, navegando en busca de un postre rico, fácil y llamativo, me encontré con el blog de Cris y con estas fantásticas fresas con chocolate.

Son muy sencillas de hacer y la verdad es que están deliciosas. A todo el mundo le gustaron, y aunque me dieron un poco de lío el resultado fue muy bueno.

Desde aquí, os animo a probarlas, porque realmente vale la pena.

Ingredientes
Fresas
Chocolate negro para postres (yo use el de Nestle)
Un chorrito de leche
Almendras troceadas
Mantequilla

Lo primero que debemos de hacer es lavar las fresas, las secamos bien con papel de cocina y les pinchamos un palito por la parte de las hojas.

En un cazo, ponemos la almendra troceada con un poquito de matequilla y la vamos tostando a fuego lento (yo en mi vitrocerámica lo hice al 2). Cuando esté tostada, la retiramos a un papel de cocina para que absorva el exceso de mantequilla.

Ponemos los trozos de chocolate en un bol apto para microondas y le echamos un chorrito de leche para ayudar a fundir. Lo metemos al micro y lo calentamos más o menos durante dos minutos. Aquí cada microondas es un mundo, así que el tiempo es relativo. Tedréis que ir probando.

Cuando el chocolate esté derretido, metemos las fresas una a una y les damos un par de vueltas para que queden bien recubiertas y acto seguido, las rebozamos en la almendra.

Lo único que nos queda ahora es ponerlas a secar. Yo no quería ponerlas directamente en un plato para que no se me estropearan, y como no tenía nada más a mano,  puse libros en la encimera y fue poniendo las fresas entre las dos superficies a secar. Pero no olvideis poner un papel en el suelo, porque mientras están calientes pueden perder algo de chocolate.

Una vez seco el chocolate (mas o menos media hora) las metemos en la nevera hasta el momento de servir.

As You all know, last Sunday was Mother´s Day and, like Mother is only one, I had to do something special for Family Lunch.
This way, surfing the net looking for a tasty, easy and eye-catching dessert, I met Cris´ blog and these great strawberries with chocolate.
They´re very easy to do and the truth is that they´re really delicious. Everybody liked them and, although they gave to me a little of foul-up, the result was very good.
From here, I encourage you to try them, because, they really worth it.
Ingredients
Strawberries
Black chocolate for desserts (I used Nestlé)
A dash of milk
Chopped almonds
Butter
The first thing We have to do is washing the strawberries, dry them thoroughly with kitchen paper and pierce a stick on the side of the leaves.
In a saucepan, put the almond with a litter piece of butter and toast them in slow fire (I put my cooker in number 2). When toasted, retired them to a kitchen paper to absorb the excess butter.
Put the chocolate pieces in a suitable bowl for microwave oven and pour a dash of milk in it to help melt. Put the micro on and heat for about 2 minutes. Here, each oven is a world, so time is relative, you must try.
When the chocolate is melted,  put the strawberries into it and give them a pair of rounds so they keep well covered and inmediately afterwards, coat them in almond.
The only thing We have left now is to set them to dry. I didn´t want to put them in a plate so they went bad, and having nothing better, I put books on the worktop and was setting the strawberries between the two surfaces to dry. But, don´t forget to put a paper in the floor, because while they are warm, they can loose some chocolate.
When the chocolate is cold (more or less half an hour) We put them in the frigde until the moment of serving.

Primera receta de la primavera // First recipe of spring


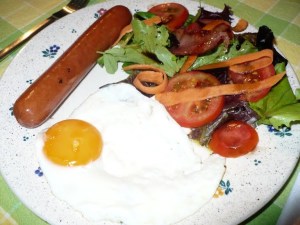
Plato combinado

Realmente, esto del blog requiere mucho tiempo… y después de estar todo el día trabajando, no siempre tengo fuerzas para actualizarlo, así que tengo varias recetas pendientes de publicar…. Empezaré por estas dos.

Las hicimos un sábado de noche porque queríamos algo fresquito y de toda la vida. Así que nos preparamos un plato combinado de esos que todos hemos tomado alguna vez.

Tan fácil como huevo a la plancha, salchicha ahumada y ensalada variada.

Pero como no íbamos a conformarnos sólo con esto, pues nos decantamos también por «Galeones Serranos», ricos, saludables y tremendamente apetecibles.

Galeones Serranos

Medio melón
Jamón
Zahanoria

Cortamos rodajas del melón y lo ponemos en una fuente.

Por otra parte, cortamos el jamón en lonchas un poco gordas de unos 15 cm de largo, y lo doramos un poco en una sartén.

Hacemos unos cortes trasversales en el melón e incrustamos las lonchas de jamón. Para decorar, simplemente unas virutas de jamón y unas lonchas de zanahoria cruda.

Mixed grill
Actually, this blog requires lot of time, and after being all day at work, I not always have the strength to update, so I have several recipes waiting for publishing…. I´ll start with these two.
We made them at a  Saturday night because we wanted something cool and tipical. So, We prepared a mixed grill of those that everybody has had sometimes.
As easy as grilled egg, smoked sausage and mixed salad.
But, We wouldn´t be satisfied only with this, We also choose nice, healthy and extremely tasty «Galeones serranos».
Galeones Serranos
Half a melon
Ham
Carrot
Cut slices of the melon and put them in a bowl.
On the other hand, cut the ham into little fat slices of about 15 cm long and We brown them in a frying pan.

We make several cross-sectional cuts in the melon and set the ham in them. To decorate, just a few shavings of ham and slices of raw carrot.